Saturday, September 8, 2018

Project List

2016
Switch shaft seal to stuffing box 350
Replace Cutlass bearing 1805
Repack rudderstock stuffing box 300
Clean engine mounts 180
Steering service 250
Seacock service 475
Exterior varnish 3290
Add salt water foot pump at galley sink
Head rebuilt
Trinka conversion to sailing dinghy 2000
Traveler redesign- self
New Sea Frost electric fridge w/ freezer box 5290
New Firefly batteries (2 Group 31) 1382
Victron 702 battery monitor 236
Replaced all lights with LED - self
added Solar panels
replaced VHF radio 260
added AIS transceiver 2120
Safety equipment added
  Zoidak liferaft
  jacklines
  flares (SOLAS), smoke signals, rocket flares)
  throw line
  SOS Dan Bouy
  EPIRB battery replaced
Irridum 9555 sat phone 1705
Storm jib (used) 145
Added running backs 1600
Added boom padeyes for preventers 725
Added Lexan drop boards for offshore 425
oil change
Added secondary winches (Lewmar Ocean Series 30CST) 1350 - self
Repaired keel damage from running aground 1300
Replaced Autopilot controller 50
Repair boom gooseneck 580
2017
Replaced cabin top winches and added bases to raise them and prevent wraps 1500 - self
Sailrite LSZ-1 sewing machine 
Canvas:
  built boom-hung sun awning - self
  built sun cover for dry storage - self
  built covers for teak cap rail - self
Replaced shower sump pump
Fuel polishing and fuel tank cleaning
Removed engine:
  replaced engine mounts
  replaced wiring harness which was undersized
  replaced starter
  removed rust and painted engine
  replaced impeller
oil change
2018
Irma repairs done in Caribbean:
  Replaced standing rigging after Irma 9174
    LC 32 ProFurl furler
    added Wichard wheel backstay tensioner
  Replaced lifelines 1234
  Bow pulpit repaired 1685
  Replaced VHF antenna, masthead tricolor LED, windex, Raymarine wind tranducer 2233
  Replaced wires (wind, VHF and power) in the mast
  New lines - boom vang, main sheet, flag halyard
  Installed radar pole 1800
  Replaced Xintex s-2 Propane monitor (due to water damage) 486 - self
  Replace Victron (due to water damage) - self
Bottom heavily sanded and painted
Repacked propeller shaft stuffing box - self (partly)
Winches cleaned (7) - self
reduced friction in reefing system with low-friction rings - self
added Jordan Series Drogue 1400
Irma repairs done in Maine:
  Replaced starboard rubrail 6300
  Replaced starboard caprail 10600
  Rebedded starboard stanchions
  Rebedded starboard genoa fairlead track
  Replaced starboard chainplates and repaired bulkhead below them that was crushed in Irma
  Replaced taftrail 4300
  Repaired hull-deck joint on stern
  Reinforced aft chucks (so they can anchor running backs)
  Steaming/deck light
Rebuilt all portlights (12)
Replaced both overhead hatches
Awlgrip touch up
Repaired blown out Genaker 1000
Installed Monitor wind vane steering 7500
Rig inspection 1000
Added 6:1 purchase on the main outhaul 400
Added reef line fairleads at the boom gooseneck
Installed a rope clutch for the jib furling line
added VHF speaker at helm 300
Filled the fastener holes in the cabin end
Patched the nonskid
Trimmed the cabin sole lift outs
added Forespar carbon fiber spinnaker pole  2900and mast track
2019
Irridium Go! with external antenna and Predict Wind subscription
sails 22k
  Quantum 6000 main 6800 and jib 6300
  Solent w/reef 3500
  Hood MPG drifter
Convert to 2-line, 3-reef system 7300
Dyneema stay added for Solent 4600
halyards and headsail sheets -- built by me
soft shackles for Solent -- built by me
Clean bilge and under floorboards after flooded
Strip varnish 1650
Repair stbd rubrail joint
Rebuild wheel brake 750
Manual bilge pump inside cabin 1700
Recalibrate Raymarine wind instrument
Replace autopilot control head with one found on eBay
Install light on wind vane
Service windlass 1500
Install USB outlets 450
Energy system install -- 140A alternator, regulator, new pully to accommodate wide, flat belt 3000
Clean up poor electrical wiring 3300
Battery charge/discharge test - to evaluate existing batteries
Service seacocks which were underwater when the cabin flooded in hurricane 200
Repair floor timbers 2150
Achilles inflatable floor dinghy 4000
Yamaha 10HP outboard 3000
Rocna 20kg anchor
Shaw and Tenney oars for tender
new Espar heater 4400
new water heater 1800
exhaust 1250
engine inlet hose1000
in Noank:
Gerry and Sandy reset spreader height
New electronics 12,000
    Raymarine chart plotter, type 2 Autopilot, Quantus digital radar, 4 repeaters to helm and nav station
Replace Xantek propane sniffer again
build storage for Sailrite sewing machine in locker
installed rope hanger, copied Bluebird
fixed v-berth shelf, first of several times
splice anchor snubber
adjust stuffing box (becomes regular chore
oil in outboard motor's carburetor because stored wrong side up
Trinka centerboard insert to keep water from coming in centerboard while towing, w/Sandy VanZandt
rebuilt windlass with parts from a bike store at picnic table in Marthas Vineyard
John Williams:
seal antifreeze leak forward side engine hose
oil change
New hoses to and from head, holding tank, thru hull after I tried to unclog for a full day 1460
new Force 10 stove 2250
rebuild gooseneck and reefing blocks after failure 1500
lag bolts in stern mooring chock after block ripped out, Leif unable to get nut on end 440
in Maine:
added rope clutches for 3rd reef, Leif pointed out they were backwards, repeated
replaced water pressure pump
replaced shower sump pump but it failed again shortly thereafter
hung internal clothes line and food hammocks
laced leathers onto oars
Life raft recertified
sewing:
canvas case for electronic keyboard
laundry hamper
bags under aft quarter berth shelf
bag for v-berth forward panel
remove runners from bottom of hard dinghy and fill holes
unclog engine seacocks many times
remove lobster pot from prop in 52F water
Built shelf for third battery 
3 new Firefly batteries for expanded house bank
Steiner binoculars replaced (warranty)
in Chesapeake:
new refrigerator thermostat due to corrosion of old one
replace Dyneema Solent stay with Coligo
increased purchase in Solent stay tensioner
replaced steering cables after finding serious fray
loud siren for Raymarine radar and AIS alarms
in Caribbean:
reattach Autopilot base which ripped off because Monitor wind vane was engaged at same time
replaced spinnaker with used one from Bacon Sails
thru bolted chart plotter bracket to swing arm after wood screws ripped out underway
remove water and repair force 10 stove due to salt water
Developed new fairlead for Solent halyard -- 4 month process, completed in Pointe a Pitre
reroute solar wires to bimini
Marionics repairman found corrosion of cord going to AP control head
Tracked down freshwater leak and found two
Replaced engine pulley because a bolt fell out then other holes elongated creating wobble
replaced propeller zinc underwater
repair Genoa sheet after wrapped around propeller, invented way to lengthen non-tensioned tail
replace bilge pump float switch
Rebuilt head foot pump
Teak oil exterior wood several times
T9 protection of hinges and latches
several patches to Bimini
reset porthole clearances with Leif and reduced windows which leaked
replaced bilge alarm siren with one from auto parts store on Guadeloupe
LFR for spin downhaul
reattach wood trim piece that had gradually accrued
oil change (1st one by self with IYM pump)
rig inspection by Wickhams Cay II riggers found set screw missing from fuller
new Wichard back stay tensioner (warranty)
lube masthead shivs
replaced lifeline gate
IYM replaced shifter cable in Nanny Cay
new Raymarine EV-1 compass (warranty)
weld nav station chair base back together
new washer that fits into slot on helm axis
built curtain so Ruby could have her own place
spliced traveler
respliced Genoa halyard after chafe found
sewed leather spreader tip covers which Gerry had left taped after
cleaned winches
rebuilt fender board
sail repairs at Quantum after passage home (torn main luff, torn Genoa cover, luff flutter warranty)
after year of cruising:
Fishing Bay marina in Deltaville repairs (never again)
    oil change
    lube thru-hulls and replace galley sink thru-hull
    replace frozen exit block base of mast
    repair fuller foils first time
Annapolis electronics
    separate auto-pilot wiring from chart plotter circuit
    sent Raymarine chart plotter in for warranty repair
M Yacht repairs
    forward bulkhead repair where it was buckling
    sand and paint bottom
    inspect and lubricate rudder bearings
    replaced impeller
    repack stuffing box
    new window gasket (incredibly effective solid tubing)
    buff topsides
    new bilge float switch
    replace balls in Harken Battcar system for main luff track
Quantum sail repair 1100
Mystic
    new Victron charger/inverter (Lucas)
    troubleshoot poor Vhf/AIS signal
        new splitter
        rerun antenna cable from splitter to mast
        new antenna
    WiFi antenna and router
reinforce V-berth shelf with wooden block (self)
replace pulpit-mounted fairlead block for furler line (self)
replace fridge gasket (self)
replaced o-ring gaskets for Dorade vents (self)
replaced exit blocks for Monitor with Protexit Blocks (self)
in Bermuda (self)
   reconnect compass light via solder
   replace Monitor lines after chafe  
Fort Rachel
    fixed fulrer foils properly by dropping headstay (Jeff Morgan)
    haul and wash before Maine rocks Race
replaced forward most pulpit-mounted block for fuller
Maine Yacht Center 2021
    starter cable cleaned
    oil change
Maine Yacht Center 2022
    Base of mast corrosion cleaned up 1000
    Mast step repaired 225
    Zincs 250
    Espar repair 1000
    New Propane Cylinders (too embarrassed to list cost)
    Bow light repair  450
    reconnect autopilot to Raymarine control to enable auto wind vane 650
    Wire conduit in mast replaced along with wires including better Vhf cable 1700
    new Vhf antenna
    New starter motor 900
    New fuel gauge
    Tachometer repair and clean rat's nest of wires behind control panel
    Move batteries forward to move weight out of stern 1500+
    New starter motor and relay, moved forward
    Keel bolts tested with torque wrench 360
    Outboard motor serviced
Built new set of hanks that are longer for Solent and a set for staysail with pull ties
Discussed changing rake with Chuck Paine and Brian Harris but did not change it
Sent GO! to OCENS who confirmed its death
Leather steering wheel cover, boat gift from crew
Huge down wind spinnaker, Quantum 6500
Correction of data loops in Raymarine by Lyman Morse 900
Hired install of impeller in Rockland 150 (I had part)
Installed Harken 150 cam cleats for cockpit winches (gift from crew)
Off season projects winter '22-'23
    new Windsor life raft
    replace spin head swivel block
    clips to hold traveler line at helm
    gaskets for all opening ports
    respliced wire staysail stay with Dyneema (using stretched Solent stay)
    repaired spinnaker tack line which had chafed by resplicing it (shortened)
    new larger diameter preventer lines
    sewed another patch on Bimini
    built fender covers with Sailrite kit given to me as a gift
    obtained over-the-top blocks from Schaefer in an attempt to reduce Monitor chafe
    replaced solent halyard
MYC winter '22-'23
    standing rigging 10k
        retained Merriman turnbuckles
        new Harken Mark IV furler
    new diverter for solent
    rebedded deck hardware to address leaks in vicinity of stbd dorade vent 1750
    replace spin halyard block, shackle (nearly worn through) and bale 450
    keel fairing 5k
    bottom paint 1350
    Beta 30 engine, Balmar 170A alternator 15k plus install
    new bow running light placement on either side rather than centerline 2k
    new salt water foot pump in galley 265
    new trash can runners 500

Transmission oil change 25h

Oil change at 50h

Keel gap evaluated by Adrian Johnson, AMS and Chuck Paine (designer)

Extra Keel bolt place forward on centerline

Cabin cushions professionally cleaned 1500

Moved starter fuse to above engine, port side

Replaced light on Ritchie Compass

Boom repair, forward stb side

2024

New bag for Lifesling, homemade

2025

stripped bottom down to fiberglass

reinforced keel-hull joint, belt and suspenders

New 145 Genoa

new tri-color

replaced windex vane at top of mast

repaired kite that had ripped sheet across in 25+ in Trans Superior

2026

cleaned fuel tank

replaced floor supports that had cracked

repaired broken tabbing

new (rebuilt) Raymarine Axiom chartplotter


Sunday, April 29, 2018

Reducing friction in single-line reefing

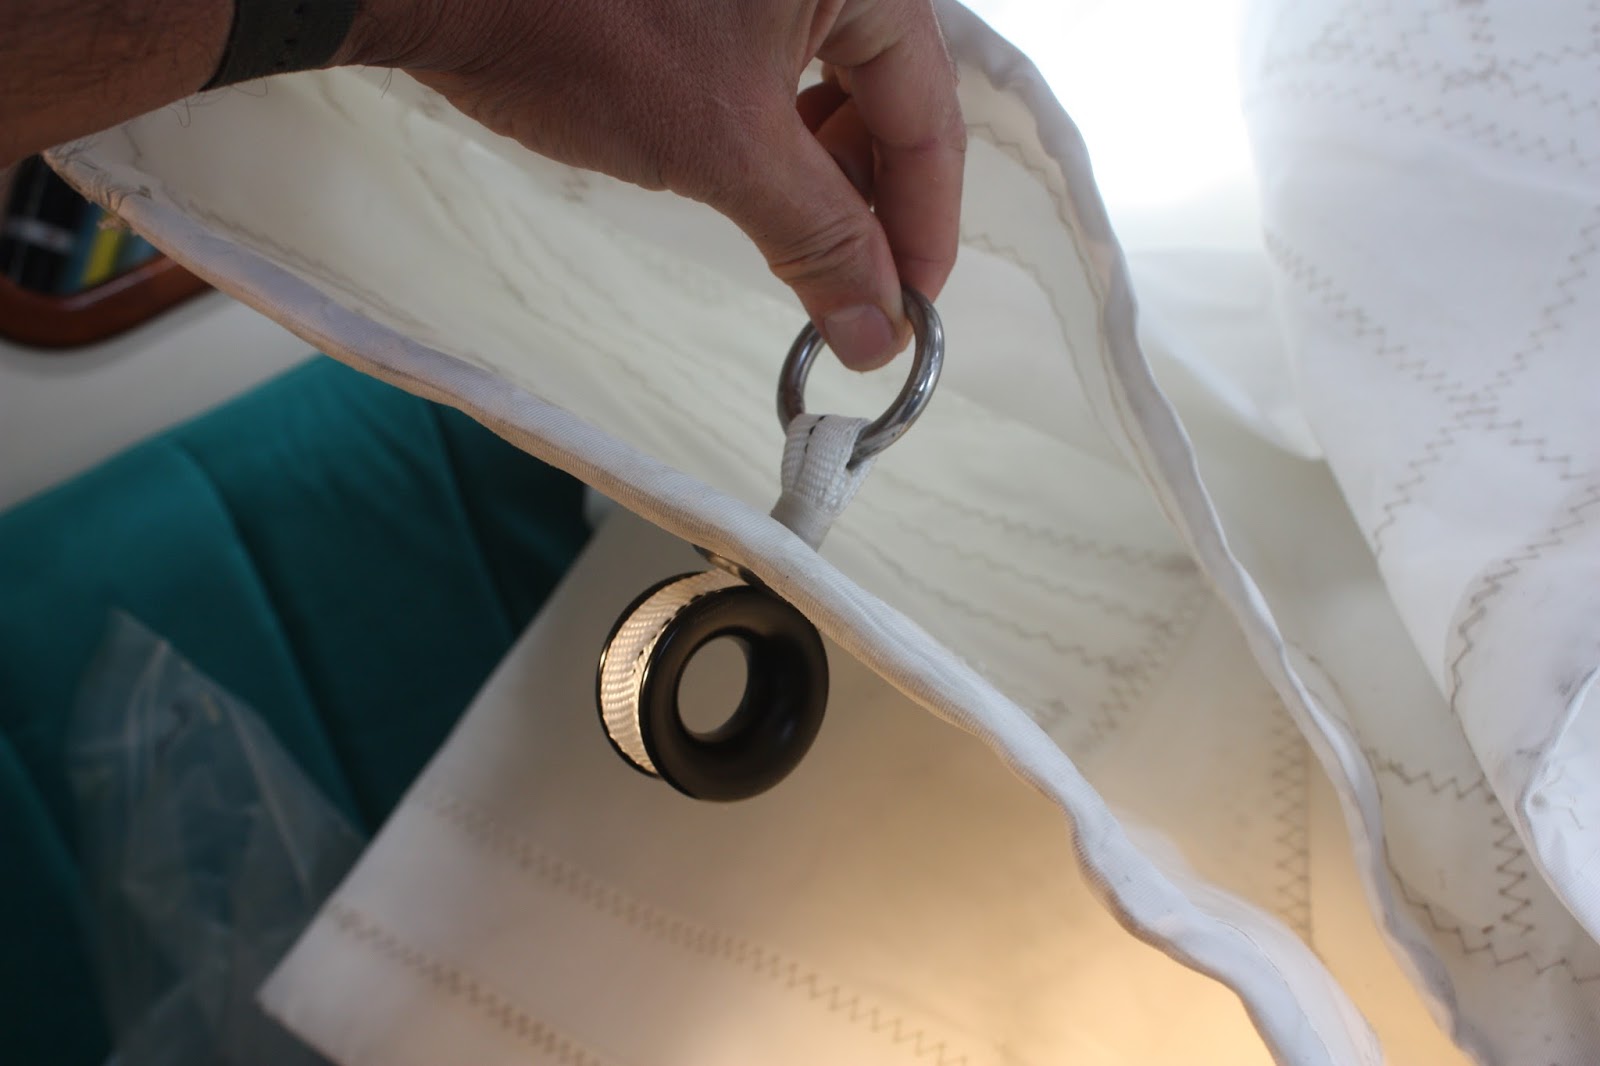
New system at luff
New system at leech


Rings atttach to leech via Dyneema loops.  The crossover
is at the far side of the ring, as shown with the black mark,
so that the loop is reinforced with the seizing


The friction in my reefing system was making feel not confident that I could reduce sail in a blow.  With the reefing line on a winch, in moderate winds, the resistance led me to bust the block at the base of the mast which turns the line back toward the cockpit.  I believe I have solved the situation by attaching low friction rings at each of the mainsail's six reefing cringles.   A test of my new system in 15kt winds on a narrow reach showed significantly less resistance with an ability to pull it in by hand.

Rings attach to luff with webbing. Sewn and seized
The friction in the system occurred where the reefing line passed through the rings pressed into the sail, one in the luff and one in the leech for each reef.  At each pressed ring, the line is forced to make a low-radius, 180 degree turn around a non-smooth surface.  Low-friction rings allow the line to be turned over a smooth surface with a larger radius.

The webbing attachment uses a ring while the Dyneema
loops are built going through the leech cringle
Before going with low-friction rings, I had actually bought blocks that I was going to attach at the sail cringles. In my perseverations about the weight I would be hanging from the sail, I learned about the option of using low-friction rings from the Justine Owners Facebook group. My local sailmaker, Tim at Sailcrafters, helped me figure out how it was probably done.


I attached the low-friction rings to the leech with Dyneema loops.  These are easy to do, clean looking and strong.  I got the advice to make the loops 6" long (when collapsed) from Jaimie at Sailing Totem.  Six inches is about as short as you can make it using 6mm Dyneema line.

Dyneema loop before the ends are trimmed and drawn into
itself.  This has been floating around our house for months.


There are good videos on how to make Dyneema loops.  Bury 6" on each side for a loop made with 6mm line (whatever the diameter of the line in mm, you bury that much in inches).

Thursday, November 2, 2017

Surviving Irma

Gryphon, by a stroke of luck, was left standing after Irma's 200mph winds hammered Tortola.  News of this good fortune did not come quickly.  In the days after, social media was buzzing with widely varying reports, completely unreliable.  The hurricane had hit Sept 6 and in the early morning on Sept 9 an email chain among the customers of Island Yacht Management turned me on to a 10-minute YouTube video https://www.youtube.com/watch?v=ereQ7AHeLVQ&t=546s taken by a drone.  I spotted Gryphon at the 9-minute mark.  I instantly recognized my own boat but needed confirmation so first I took a magnifying glass to my laptop screen then I went to a neighbor's and used his large monitor for a better view.  There had been so much misinformation.  I needed to be sure.  I gradually became certain that I was seeing the dinghy on the fordeck, the teak toe rail, the right number of windows and the radar on the backstay.  I could also see, by playing the video, that there was daylight between her and everyone else.  

Gryphon found standing with the rig intact
I am insured, but a boat is not one of those things that is simple to replace.  To go to sea in a boat you need to trust her.  I have 95 days invested in learning about this boat, coming to know what to expect, knowing what works and what needs a little TLC.  We'd been through an ocean passage, with all the handwringing before departure.  But not only did I dread starting over, there was not another boat I could imagine replacing her with.  I even looked at the brokerage listings, but I couldn't convince myself otherwise.  Even the other Justines out there, or which there are few, did not have the characteristics that I value in mine.  For those first few days I feared that the ticket to my adventures was gone.

While I was certainly reassured by the overhead shot, it wasn't until a full month later, and a second hurricane, that I saw pictures from ground level and received reports that the water inside was 6" below the floor boards and that she appeared to have minimal damage.  Next the insurance report came in.  They say the radar, which is mounted on the backstay, is damaged and probably the backstay, too.  One foil section on the headstay needs replacement; some damage to the teak and the rubrail.  Hardly anyone probably came out of this storm with a list so short.  

The view standing on the deck of Gryphon
Owners are not allowed to work on our boats until they clear the yard.  They will accompany me to inspect her, but I cannot do work and I would have to get a hotel room, so I am waiting for news that they are getting closer to me.  They are moving the boats one by one.  With the crane and the time to disentangle each rig it's costing $8000 per boat.  The latest picture sent by my boat guy shows her on the front row.  Seeing it I was humbled by the narrowness by which my boat seems to have averted being crushed by her neighbors.  


Getting close
So now that I know I still have a boat my my ambitious sailing agenda is back on.  I am planning for a 9-day sail-training expedition, a spring break trip with the family and an offshore passage back to the US.   I need to completely evaluate her soundness including scheduling some expert evaluations and sea trials.   The insurance surveyor estimated $30K damage. I wonder how it could be so much and fear that I might be underestimating things.  And then there is the list of projects from before the storm hit. I am back working, and she is one of the smaller boats, so I should be able to afford it.  But given that I am working again it is hard to find the time.

I am also sensitive about pursuing my own hedonistic pursuits when so many others have suffered the complete loss of their boat.  The woman who started the email chain among Richard's customers --  her boat was not even found.  It presumably sunk in the marina.  It is probably still down there, but no one is looking any longer.  Divers were looking for boats, with only one foot visibility, and they were craning them out, but the crane has left.  I was a lucky one.  Richard himself lost the roof of his house.  The guy who does sail training with me can't even live in his house.  He and his young family hid behind the baby changing table while the storm tore it apart.


My appreciation for the forces of nature has been enhanced.  I have in my own small way experienced the devastation of a hurricane.  I have been drawn into the community in Tortola that was devastated.  In all these ways, this adventure with the boat continues to add to my life. 


Addendum:  The Oyster leaning against me apparently weighs 60 tons.  We are waiting for a bigger crane to arrive to move it.  The backstay of the bigger boat is crossing my forestay.  My rig (the wires holding up my mast) must be under enormous tension and is probably damaged.  
Best angle to see bend in my forestay


Near miss

Saturday, August 19, 2017

Sun tarp picture

Sun cover
I built this to keep sun off the boat while it is in storage.  I built it without measurements from the actual boat.  I used drawings from the sail plan and my own photos to determine the design.  I made a mock-up of paper to make sure my geometry was correct.  It turned out beyond what I expected.

Sunday, July 9, 2017

Sail dynamics

Well-trimmed sails
I am very interested in the science of how our boats interact with natural forces, both wind and water.  I sail partially for the connection with nature and feel more connected when I understand it.  I have found a person, Paul Exner out of Tortola, British Virgin Islands, who can explain these concepts at a high level while putting them into practice on a boat. These are my thoughts on an afternoon we spent together.

The properly set sails of a boat cut through the wind like a blade.  The rounded shape of this blade bends the wind just like a river bends around a rock, we just don’t see the wind bend. And the forces created are different when a gas is bent.  Bending the wind creates relatively lower air pressure on the convex side of the sail which pulls the sail forward.  To harness this force we are able to shape and position the sail.  This triangular piece of fabric has curve built into it which we can shape by varying the tension on each of its three edges.   Likewise,  we can change the angle at which we present the sail to the wind.  The shape we create and where we position the sail vary based on the force and direction of the wind.  Ideally we position the leading edge of the sail so that it evenly splits flow of wind to each side and as the force of the wind gets stronger, we decrease the curve in the sail. As the boat moves, the speed and direction of the wind relative to the sail changes.  Getting it all right is as much art as science. 

The elements of sail shape on which we focused were draft and twist.  Draft is the depth of the curve in the sail and we can change both the amount of depth and its location. Deeper draft bends the wind more, maximizing the lower air pressure that pulls the sail forward. But there are limits to the benefits we can get with draft because the wind needs to flow smoothly across the back of the sail, bending with the sail, to create the low pressure which causes the suction. In light air the wind cannot follow the sharp curve associated with deep draft and it will spin off, forming eddies like on the side of a river, effectively unwinding its energy into the eddy rather than drawing the sail forward. In higher winds, the sideways forces associated with a deep draft can be too much and will cause the boat to lean over to the point that the hull does not move well through the water.

Apparent wind is the sum of the wind due to
boat speed plus the actual wind.  Higher
winds make the apparent wind
come more from the side

The twist of a sail is often unrecognized. To appreciate twist, see it in the picture which accompanies this post.  At the base of the sail the trailing edge points nearly straight back while at the top it is released off to the side.  The sail is twisted from bottom to top along a vertical axis. The angle of the sail relative to the boat is wider at the top than it is at the bottom. This feature is useful in light air because the wind will blow harder at the top of the mast than at the surface.  This occurs because the wind near the water’s surface is slowed due to friction.  The apparent wind (see diagram) at the top of the sail is more to the side so that section of the sail can be set wider to match the wind at that elevation. We can allow more or less twist so as to match this deviation of the apparent wind and keep the sail working through its entire height.  Of course while all this theory is good, sometimes sailing with less twist so that the sail is trimmed theoretically too tight at the top results in faster boat speed, possibly due to hydrodynamic considerations. 

In higher winds there is less change in wind speed caused by friction with the water.  Twist can still be used instrumentally because we might not want the entire sail to be working and we can twist off the top of the sail where it would have the most leverage to create heel. We can sometimes get the top of the sail to luff while it is working lower down.

Twist can do funny things when a boat is going downwind with the sail all the way  out. If we allow twist with the sail in this position, the trailing edge of the upper part of the sail can actually be pointed forward. A strong puff in this setting will heel the boat to windward — the boat rolls away from the side that the boom is on, opposite what one normally expects.  This can induce uncomfortable and potentially dangerous rolling.

Wind bends before it
meets the sail
The two sails of a boat like mine, a sloop, work together rather than as individual units.  Each sail changes the airflow over the other.  A cool thing to understand is that the wind begins to bend even before it reaches the sail in the same way that a river begins bending upstream of a rock.  The wrinkle in the wind created by a sail begins upwind of the sail! They figured this out observing the flow of smoke over a sail. Now consider the wind that is about to go over the mainsail. It is changing its course before it meets the mast, coming now slightly more from the side. This local wind shift is occurring right where the jib is operating and helps he jib work better. It creates a local apparent wind which is at a wider angle to the boat than the true wind so the jib experiences a lift -- the wind is slightly less opposed to our direction of travel. Unfortunately the jib does not return the favor to the mainsail. The jib causes the wind that flows over the mainsail to be more forward of the sail, so the main experiences the opposite of a lift, a header.  The advantage to the jib outweighs the disadvantage to he main.

The space between the sails is referred to as the slot. I do not find consensus about what is going on within the slot. There does seem to be agreement that he slot should be even, so that the sail shape and position of he two sails should be similar.  The slot would not be pinched or become wider further aft.

The shape of a sail is modified via the tension on each of its three edges — the leech (trailing edge), the luff (forward edge) and the foot — and, for the mainsail, our sail trim devices allow us to tension each edge individually. Tension of the leech by pulling the back corner of the sail down removes twist.  Leech tension, with the boom in close, is created by the mainsheet because with the boom over the deck the mainsheet pulls more down than in.  People tend to think of the mainsheet as moving the boom in and out, but it pulls down, too. Once the boom is far enough out that the mainsheet pulls more in than down, then leech tension is achieved with the boom vang. 

Tension on the foot reduces draft in the bottom of the sail while tension is the luff also reduces draft at the same time that it pulls the draft forward.  Luff tension is typically created by a downhaul, or Cunningham, however my boat is not set up with one.   We found that I could create good luff tension with the halyard, probably because the Harken Battcar system eliminates friction between the mast and the sail so the tension from the halyard goes evenly to the luff.  We also found halyard tension would change the twist.  This makes sense because pulling the head of the sail pulls only slightly less on the leech than the luff. 

When the sail is trimmed close the the boat and the mainsail is pulling more down than in, the traveler is the best tool to position the sail.  Some guy walking the docks told me I was wasting my time redesigning my traveler, but I find it an essential tool when close-hauled. Trying to use the mainsheet to bring the main in tighter at this point does more to change its shape than its position. The traveler, which controls where the mainsheet pulls from, will change the angle of the sail to the wind without changing its shape. As the sail moves further outboard the mainsheet takes on its commonly perceived role of positioning the sail in and out.

In contrast to the main, the jib only has one point, the clew, from which it is typically controlled.  We can control luff tension, and therefore draft, with the halyard but with furling gear and headstay foils, not many people are going to do that. We can, however, pull the clew in different directions to affect jib shape. Most boats have a track by which the jib fairlead (the pulley that the jib sheet goes through before it is led back to a winch) can be moved foreword or aft. Moving the fairlead foreword causes the jib sheet to pull the clew more down than back so the leech is is tensioned relatively more than the foot. Move the fairlead back and the foot gets tensioned more than the leech.  The center position for the fairlead is found empirically and is that point at which the entire length of the jib’s luff breaks at once (or all the tell tales lift together) as you head into the wind. Partially rolling up the jib changes that center. 

The jib sheet can also be redirected so that it pulls more from a position further outboard through the use of a barber hauler. This device can simply be a block attached to the rail through which the jib sheet passes before it is led to the fairlead. Paul figured out that on my Morris Justine, when sailing on beam and broad reaches, the sail had a more powerful shape with the clew further outboard.  We began with the straight forward system of a block (pulley) attached at the widest part of the boat. Over the course of the afternoon we invented a system in which we could vary the height of that block. We did this by putting the block on a line that could be controlled by a winch.  If you enlarge the picture attached to this post you can see this setup.  The jib sheet is led via the aft corner to its winch and the barber hauler is going through the midship hawse pipe, through the genoa fairlead, then to a winch

An important aspect of any headsail trim is holding the clew steady. If the clew is allowed to move around, the flow of wind across the sail can detach and the suction is broken.  The more stable the clew the better and thus the benefit of fixing it with a pole or building rigid sails like the America's Cup boats.

I have deliberately not discussed the hydrodynamic issues which include the forces generated as the keel moves through water.  The keel acts like a foil, creating forces which help the boat go upwind, similar to the sail.  There is interplay between the aerodynamic and the hydrodynamic forces.  I will write about that as I understand it better.

We had the picture of our handiwork taken by a guy standing in an inflatable, one hand on a throttle extension and the other holding a camera.  He is the boating equivalent of the guys who position themselves on popular ski runs and try to sell you a picture. He came along just as we were getting things dialed in. Good timing to sell me a picture. An excellent souvenir for a sailing dork’s vacation.

References:
Sail Power by Wallace Ross
Seaworthiness, The Forgotten Factor by C.J. Marchaj

Saturday, April 15, 2017

Bulwark Cap Rail Covers

The Caribbean sun is doing a number on the teak.  Before I start varnishing I want to at least know that it will be protected when I am not there.  Here are photos of the covers I constructed.

At home, where I had the sewing machine, I created the basic foundation for my covers.  For each side I made 7-inch wide strips, double-hemmed on each side, 42 feet long.  For the stern, the strip was 9 inches wide and only 10 feet long.  I used Sunbrella fabric and V-92 thread.  For sewing the double hems I spooled the fabric off a broom (as shown in picture).  The spool kept the double hem folded and allowed it to easily feed into the machine.  I used Sailrite advice and videos from their website and was inspired to buy a Sailrite machine after struggling through this project with a less suitable machine.


The cap rail is interrupted by three stanchions on each side and two in the stern.  I cut openings for each stanchion, but had to do that at the boat. I had pre-made the velcro pads at home on the machine but at the boat I had to hand-sew them in place.  Each one took me about an hour to hand sew.  I did them at anchor with a cocktail after the kids had gone to bed.  (My new Sailrite will come with the Monster Wheel for hand cranking).  This picture also shows some of the creative ways I found to attach the covers to the boat so that I could limit the number of snaps.  There is a loop of webbing around the mooring post and a tie through the hawse pipe.
I was able to limit the use of snaps to four on each side and two on the stern.  The reason to limit snaps is that the sockets are screwed into the fiberglass, are not as pretty and will corrode.  This picture shows my how I hung the water bottles directly opposite the snaps to avoid pulling the cover off.  The snaps are positioned to put slight tension on the fabric.
I cut slits for the ladder attachment points.  I tried to do most cuts with the hot knife. but found that cutting with scissors and singeing with a lighter also worked.  Here again I can attach the cover with a tie through the hawse pipe.

I avoided snaps in the back by tying the corners together (Kate's idea).

When I made mistakes I kept going.  Here I cut the opening for the back stay in the wrong spot and just patched it

I hung bottles filled with seawater on outside so that I did not need hardware on the outside hull (thanks to Tom from Nomad for that idea).  I used a constrictor knot around the neck of the bottles and tied them to the grommet with two strands.  The line through the grommet should prevent the grommets from hitting the paint in the wind.


More bottles hanging.  I used one bottle for the corner.

I thought it was clever to use one bottle in the corner.   


Meditative sailing videos from the passage

These two videos were contributed by my crew member Adam from his watch during the 
Caribbean 1500